Pages

Showing posts with label card making. Show all posts

Tuesday, 18 December 2012

Christmas OU Crafter Swap

I'm part of a facebook group that is full of nothing but OU students who like to craft. It's a great place to show off what we're making, discuss crafts, techniques and materials and help each other out if we're getting stuck on something (there's been a fair bit of first time crochet going on over there) and it's also just a nice virtual place to socialise with people who have things in common with you.

A couple of people on there got together to arrange a Christmas Swap. Strictly handmade, but no restrictions on what, how or colours etc. Mine arrived and is patiently waiting in a hiding place for me to open on Christmas morning, yay! I can't wait to find out what someone has made especially for little old me.

I'm hoping that my handmade offering is with it's new owner by now. I'm fairly certain that none of the OU crafters come and read this blog, so I think I'm safe to show you what I've sent.

I crocheted a simple soft white cowl in a mock moss stitch with an eyelet edge.I crocheted two different style of snowflakes and layered them as a decoration.


I also made a set of three tree decorations from calico. They are heart shaped and also have a snow theme: 'Frosty the Snowman', 'Treetops Glistening' and 'Let it Snow'. The words on each of the decorations are made using mini lettering stamps and some black fabric ink. Each heart is hung by a ribbon loop fastened to the top of the heart with a button.


Frosty is made using buttons and a small piece of dark brown felt.


The snowflake is embroidered on top of a circle of white felt, and then beaded with silvery white bugle beads at the centre.


The tree is embroidered with a few strands of brown embroidery floss. The thicker parts of the tree are chain stitch and the thinner branches are back stitched.

Each has an added shimmer from some iridescent glitter glue added in a few spots on the main image.

I copied my Frosty the snowman for a couple of gift tags and a matching card. The card base for each is plain white card, then I have cut some red patterned paper, mounted it onto green sugar paper for a thin border, and fixed my Frosty to the centre of the red with some strong glue.


I hope she likes what I've sent. I definitely enjoyed making them. I'm already making another cowl as another Christmas gift for someone!

Tuesday, 4 December 2012

Toddler Group Tuesday - Gingerbread Christmas Cards

Christmas is getting closer and closer by the day (sorry if you hate being reminded!) especially now that we are officially in December!

This week we've been make some lovely gingerbread stamped cards.


To make your own gingerbread cards you will need:
- Plain card in festive colours or white
- Gingerbread coloured paint
- Sponge
- Christmas Cookie cutters
- Gold glitter
- White ric rac or yarn
- Coloured sequins
- Pen
- Scissors
- Red/green paper
- Metallic pen

First fold your card in half to form your card base.
Take your chosen cookie cutter and place it on the sponge. Drawn around the shape with your pen, then cut out. This creates your own Christmas sponge stamp.(If you're lucky enough to have christmas stamp shapes that are big enough, you can skip this step!)
Using your Christmas stamp and the gingerbread coloured paint, stamp your shape onto your card.
Whilst the paint is still wet, stick your white yarn/ric rac as icing, and your sequins as sweets. The sprinkle all over with glitter for some festive sparkle!


Cut a strip of red or green paper (I cut ours in a curved shape) and write your message in metallic paper then glue onto your card to finish.

All done!

Here's the Smaller Person's finished Gingerbread Snowman :)

This works well with any Christmas shape, but especially well with Gingerbread man shapes. Ours today were Christmas Trees, Bells, Snowmen and Angels. You could make your own gingerbread stamped garland in the same way, by cutting your Gingerbread creation out once they are dry, punching holes along the top and threading on a ribbon to hang up. You could cut out 2 of the same stamped shape and sandwich a loop of ribbon between them to make a double sided hanging tree decoration. Make one side plain, and you have a lovely gingerbread gift tag. You can also stamp your gingerbread shapes onto plain paper gift bags or repeatedly onto larger sheets of paper for wrapping. There are so many things you could do!

Monday, 3 December 2012

Big Sister Card

I almost forgot to show the little card I made for a new big sister. (I showed the gifts I made in a previous blog post)


It's just a simple pink card blank with a white silhouette stuck on. The silhouette is of two little sisters cut out of self-adhesive glitter paper. I hand sketched the silhouette onto plain paper after looking for ideas on google images, then I transferred the outline to the glitter paper, and carefully cut it out. Then it was just the simple task of peeling the backing and sticking it in place.


The new big sister is only a tiny little dot herself (she's 22 months old - or thereabouts), and is friends with the Smaller Person. We think she'll make a great big sister (she already knows how to handle all her little guy friends!)

Saturday, 8 September 2012

Baby Girl Blanket

It's all good news around here lately - more congratulations to shout out to our friends Gemma and Stu. Their baby girl has just made her debut into the world.

 
I'm being a little bit rubbish today - I cannot find a photograph of Stu and Gemma together, so you get individuals instead :)
I've been working on another blanket knowing that they were expecting a baby girl. I started it as soon as I finished the last one, and made it on a similar style, just substituting the blue stripe for a pink one, and the eyelet edging for a girlier frilly shell edge.


I sat in bed finishing the last bit of the border and weaving in the ends before I went to sleep, and I just thought I'd have a quick look on Facebook to see if anyone had anything interesting to share, and there was the announcement and photo of a very fresh and well looking new mummy, and a tiny little bundle. She was an early arrival, so I wasn't expecting to need the blanket finished so soon. My crochet-subconscious must have known and made me work faster! It is also the speediest labour I've heard of amongst our friends and relatives, especially for a first baby.


While I was trying to be prepared for the manic months I have ahead, I had also made this card (a few months ago) ready for baby's arrival. It's just a simple pink card blank, a large stamp printed with red ink then embossed with clear embossing powder, finished off with a tiny pink 3D star sticker.


Congratulations Gemma and Stu, and welcome to your little girl, Evelyn!

Monday, 27 August 2012

Baby Crochet Blanket

My absolute best friend all through secondary school and sixth form has just recently become an Auntie. Her older sister gave birth to a lovely little boy earlier this month, and they named him Zachary (what wonderful taste they have!).

I've been crocheting as fast as I can to finish a blanket I made for them, but I wasn't quite fast enough. I have only just finished it.


The main body of the blanket is made up of treble crochet, then the border is double crochet, with a 2 row blue stripe, finished with an eyelet type edging. It's the first time I've used this yarn an I absolutely love it! It was so nice to work with. It is Cygnet Silcaress DK. The main colour is Winter White, but I can't remember the blue name and can't find the label right now, sorry!


It's only a pram size blanket, but I hope they like it anyway.

I also made a few cards:


This one for the new parents


and two like this, one for new Auntie Lisa, and one for the new Grandparents.

Wednesday, 20 June 2012

Quick Stamped Cards

I'm just popping in quickly to show you these two cards I made this week.

The first one is an acceptance card for a wedding that Mr Bogert and I have been invited to in August.


I have used a small white textured square card blank. I have wrapped a wide burgundy satin ribbon horizontally across the centre of the card, and taped the edges on the inside. Next, I stamped a little church stamp onto some plain white card using black ink, sprinkled with black sparkly embossing powder and heated to set it. (You can't really see the sparkle or raised edges of the print in this photograph). If you can't quite make it out, the stamp says 'And they lived happily ever after'. I mounted the stamped image onto silver card, and then fixed this over the ribbon using little foam pads to raise it off the surface of the card. I used the same 'studio g' alphabet stamps and black ink as the Fathers' Day cards to spell out the word 'Acceptance', and then I used some of the leftover mirror mosaics from the Small Person's crown decorating a few weeks ago.


I finished the inside off with a piece of patterned paper that came free with a magazine. This covers the taped ends of the ribbon.


The second card is a New Baby Girl card for a friend. I have used the same type of card blank as the acceptance above, and stamped it with a large baby bib stamp in silver. I sprinkled white glitter embossing powder over and heated to set (again, you can't see it very well in this image). I then punched two small holes close together at the neck of the bib. Through this a threaded a thin pale pink satin ribbon (from the inside of the card). I tied the ribbon in a simple bow and trimmed the ends so that they don't overlap the edge of the bib print.


I finished the inside with another piece of free paper. This covers the holes where the ribbon is threaded through. I also stamped 'Congratulations on your New Baby' in black ink on the message side of the card.

These were so simple, quick and even a little bit fun to make!

Monday, 18 June 2012

Fathers' Day Cards

This last week we got down to a little card craft in the Wishes house ready to show all the Daddy-types in our lives how much we love them.
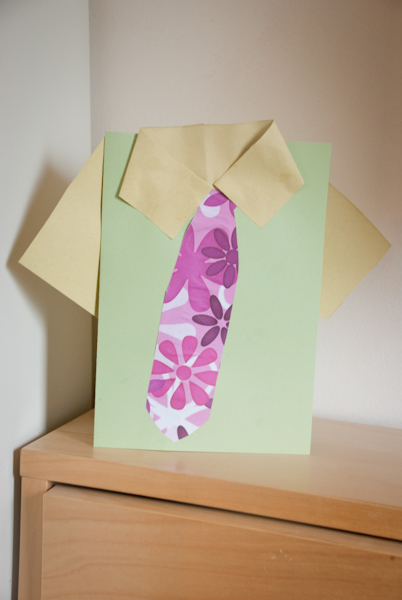
We made a few more variations of the shirt card we made at Toddler Group. The Small Person made one for her Grandad (my Dad)


The Smaller Person made one for his Grandpa (my Grandad)


and this mini square version for his Grandad (my Dad).


Then the Small Person designed and made her own Fathers' Day card for her Grandpa (my Grandad)


She used a small white square card and a pink pipe cleaner which she formed into a fluffy heart and glued to the centre of the card.

The Smaller Person had made Mr Bogert's card when we were at Toddler Group (he also made a second card which was going to be for either Grandad or Grandpa, but I got confused and gave it to Mr Bogert by mistake, so Mr Bogert had 2 cards from the Smaller Person and we had to make another card! Ooops!)


The Small Person made a card from my Pinterest all by her little self for Mr Bogert


She has used some blue checked scrapbook paper, drawn around her hands and cut them out. She has used a red pencil to write 'I' and 'You' and glued a felt heart between (I love you) and then stuck the 2 hand shapes together with a strip of concertina folded paper. She used the red pencil again to write 'This much' across the strip with a heart tipped arrow pointing in both directions across the strip. She did a great job without any Mummy interference.

They also did some papercraft at school for Fathers' Day. On Friday, she brought home a little hand coloured paper basket filled with colourful tissue paper and a cheese scone that she had baked at school.


What a sweet little note! And I do believe this is a portrait of Mr Bogert and his 'cool' hair. Yep, that definitely looks like my hubby :)


I also used a little Pinterest inspiration for my Father's Day card for my Dad.  This is my version.


And then that gave me the idea for this card for my Grandad


I have used a small textured white square card blank, a set of 'Studio g' alphabet stamps, some glue and a piece of black craft foam for the tie.

The Small People bought Mr Bogert a pair of new shoes that are sort of semi-casual. They're a bit smarter than his Animal trainers or running trainers, but not too smart like his work shoes.

We made chocolate brownie bites for my Grandad and Dad, which we wrapped in parchment paper and tied up with a thin blue ribbon.


The Small Person and Grandpa


The Smaller Person and Grandad

Poor Mr Bogert didn't get his usual breakfast in bed :( He had to drive me for a bridesmaid dress fitting, but he did get a full breakfast when we got back at 12pm! Mushrooms, Sausages and all the works. He played modelling dough creations with the Small People and we watched 'Look Who's Talking Too' - I'd forgotten I quite like that movie - followed by 'Getting Even With Dad'. I think he had a nice day, I HOPE he had a nice day, so long as he knows we think he's the most awesome Daddy ever!

I hope you all had a lovely Father's Day.